How to create a WhatsApp booking form
Stop saying "DM me to book." A WhatsApp booking form takes 10 minutes to set up and instantly makes your appointment process smoother for everyone.

If your booking process looks like "DM me to book an appointment," you're losing customers. Not because WhatsApp is bad. Because the back-and-forth is exhausting, for you and for them.
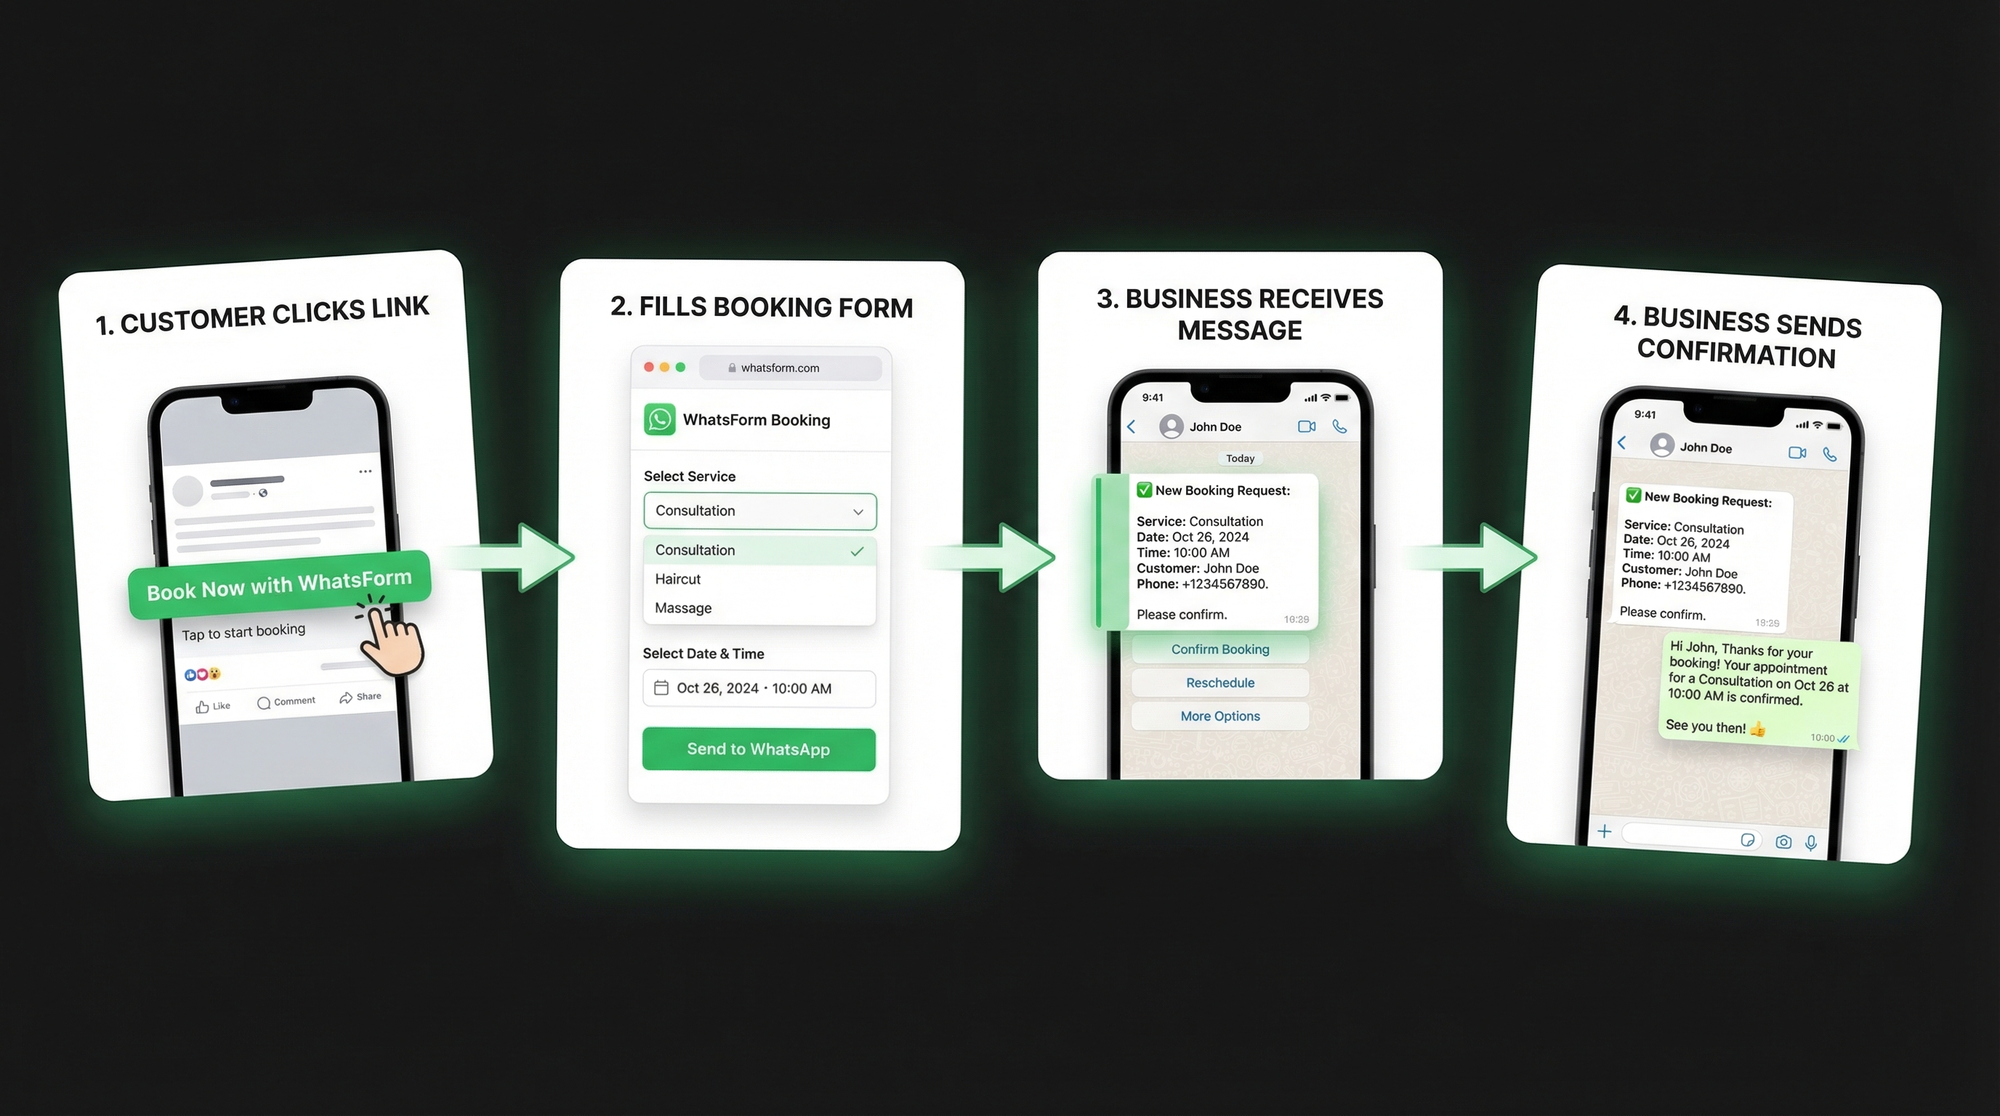
A booking form fixes this. The customer fills it out, you get all the details in a clean WhatsApp message. No chasing, no confusion, no missed bookings.
Here's how to set one up in about 10 minutes.
Why a booking form beats "message me to book"
When someone has to send you a message to book, here's what actually happens. They type "hi, I want to book." You reply asking what service. They reply. You ask for a date. They reply. You ask for their phone number. The conversation takes three hours and you've both lost the thread by the end.
A booking form cuts all of that. The customer fills in everything at once: service, date, time, contact details. You get a single structured WhatsApp message with everything you need to confirm the appointment.
Three other reasons to use a form instead of a direct message:
- Available 24/7. Your form doesn't sleep. Someone can book at 11pm and you'll get the message waiting for you in the morning.
- No missed info. Required fields mean you always get the details you need. No more "oh I forgot to ask their phone number."
- Easier to manage. Structured data means you can spot bookings at a glance instead of scrolling through scattered chat history.
This works for any type of business. Salons, doctors, tutors, consultants, fitness coaches, repair shops. If you take appointments, you need this setup.
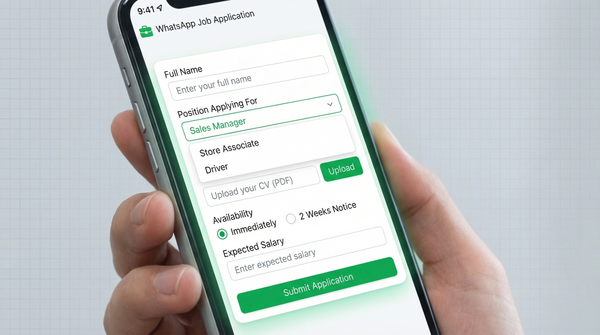
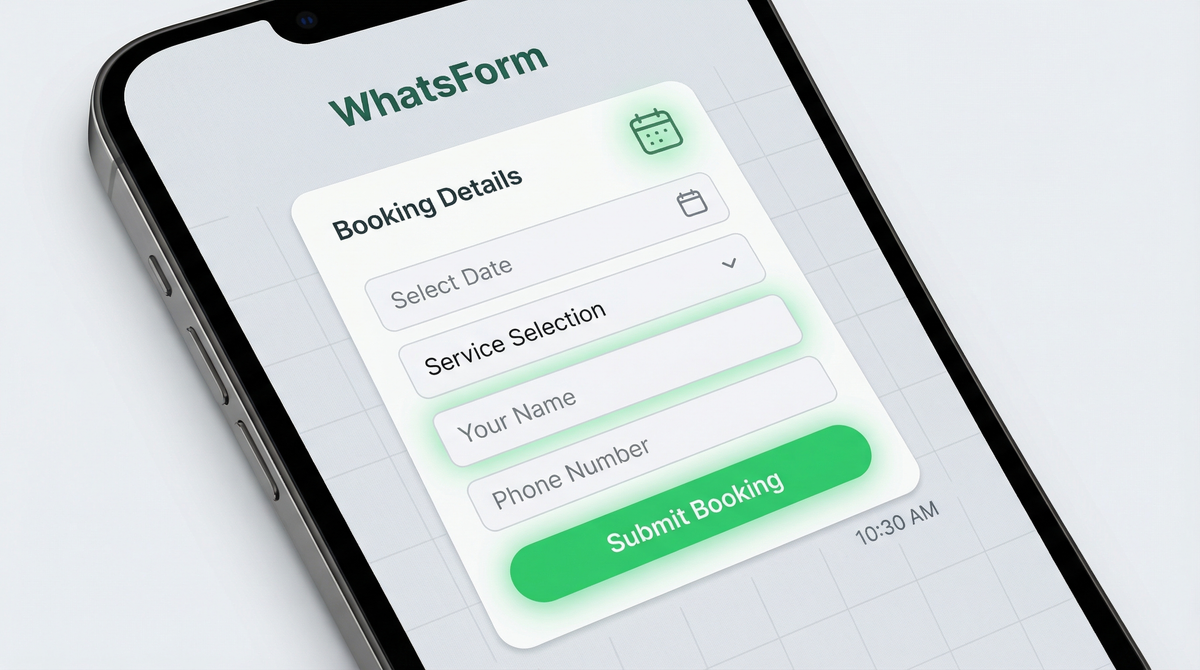
What a good booking form captures
Before you build, decide what information you actually need. A bloated form kills conversions. Only ask for what matters.
A solid booking form typically captures:
- Service type. What are they booking? Haircut, consultation, tutoring session, home visit?
- Preferred date and time. When do they want to come in? A date picker or a dropdown of available slots both work well.
- Name. Basic, but you'd be surprised how many forms skip this.
- Phone number. So you can confirm or reach them if something changes.
- Special requests or notes. Anything they want you to know before the appointment.
Email is optional. For most appointment-based businesses, a phone number is enough. Keep the form short. The faster someone can fill it, the more likely they will.
One thing worth thinking about: if you add too many required fields, customers abandon the form halfway. Five to six fields is the sweet spot for most booking scenarios. More than that, and completion rates drop fast.
Step 1: Create your form on WhatsForm
We built WhatsForm specifically for this. Full disclosure: we built it. It's a tool that lets you create forms that send directly to WhatsApp when someone submits them. No code required, no complex integrations.
Go to WhatsForm and sign up for free. Once you're in, click Create new form. You can create your form in different ways.
You can describe your form and let AI build it for you, use a ready-made template (like a WhatsApp booking template), or start from scratch and build it your way. Pick the option that feels easiest to you.
Create with AI is the easiest way to get started. Just describe what you need, and you’ll get a form with the necessary fields. You can customize it anytime by adding, removing, or reordering fields.
Next, enter the WhatsApp number where you want to receive responses. This is the number that will get every booking as a message when someone submits the form.
Need a walkthrough? The guide on creating your first WhatsApp form covers the full process step by step.
Step 2: Add service options
If you created your form using AI, most of these fields may already be added for you. If not, you can add them manually as shown below.
This is where you tell the customer what they can actually book. Add a field for service type and choose either a dropdown or radio buttons.
Dropdown works well if you have many services. It keeps the form compact and clean. Radio buttons work better when you have three to five options and want them all visible at a glance without any clicking.
Add your services as options: "Haircut," "Colour treatment," "Consultation," "60-minute session," whatever fits your business. You can also add a price next to each service if that helps customers choose faster and reduces questions before the appointment.
Think about grouping too. If you have a lot of services, a "service category" field followed by a "specific service" dropdown keeps things tidy without overwhelming anyone.
Step 3: Add date and time fields
There are three ways to handle date and time, and the right one depends on how you manage your schedule.
Date picker. Clean, visual, the customer picks their preferred date from a calendar. Works well for flexible businesses where you'll confirm availability manually after receiving the booking.
Time slot dropdown. You define your available slots, like "10:00am," "11:30am," "2:00pm." The customer picks from what you offer. Lower risk of double-bookings if you keep the options updated.
Free text field. Let the customer type their preference. More flexible, but you lose the structure. Reserve this for businesses with irregular schedules, or use it as a secondary "notes" field rather than the primary time input.
Most businesses do best with a date picker combined with a time slot dropdown. That combination gives you clean, structured data without making the form feel rigid or restrictive.
Step 4: Add customer details
Now add the contact fields. Name and phone number are the essentials. Make both required.
Add email if your business genuinely needs it, but don't make it required unless you follow up by email. Every required field that feels unnecessary to the customer increases the chance they drop off before submitting. If you ask for it, use it.
A "special requests" or "notes" field at the end is a nice touch. It gives customers a place to mention things like allergies, accessibility needs, parking questions, or specific preferences. Keeping it optional keeps the form from feeling heavy or intrusive.
Before you move on: preview the form and fill it out yourself as if you were a customer. If it feels like too much, trim it. If something important is missing, add it now before the form goes live.
Step 5: Publish and share your form
Once your form is ready, publish it and start sharing your link. Every submission will be sent to your WhatsApp as a neatly formatted message with all the details.
A few places that work well:
- Your website. Add the form link to your booking page or embed the form directly on the page. Visitors don't need to go anywhere else.
- Instagram and Facebook bio. One link, right where people already go to find you. Update your link-in-bio to point to your booking form.
- Google Business Profile. Add it to your website URL or in the booking section. Customers searching for you on Google can book without even visiting your site.
- WhatsApp itself. Pin the link in your WhatsApp Business status or include it in your auto-reply message when people first message you.
You can also generate a QR code for your form and print it on business cards, receipts, appointment reminders, or your shop window. Instant physical-to-digital booking.
WordPress user? The WhatsForm WordPress plugin lets you add the form to any page without touching any code.
And if you want to manage incoming bookings on the go, the WhatsForm app has you covered: Android or iOS.
Bonus: set up confirmation messages
Once bookings start coming in, two messages make a big difference in reducing no-shows and building trust with your customers.
Booking confirmation. When someone submits the form, send a quick WhatsApp reply confirming the booking. Something like: "Thanks [name], your [service] is booked for [date] at [time]. We'll see you then." Simple, human, effective. WhatsForm's auto-reply feature lets you set this up once and it runs automatically from there.
Reminder the day before. A short reminder message the day before the appointment cuts no-show rates significantly. You can send this manually for each booking, or use WhatsApp Business tools to automate it for regular slots. Either way, it signals to the customer that you're organized and you value their time.
These two touches cost almost nothing to set up but make your business feel polished and professional. Customers notice when a business communicates clearly, and they come back because of it.
Ready to take better bookings?
For a detailed walkthrough, check our help center guide on creating your first WhatsApp form.
A WhatsApp booking form takes about 10 minutes to set up and immediately makes your appointment process smoother, for you and for your customers.
Start with the WhatsApp booking template and customise it for your business. Or create a free account and build one from scratch in a few minutes.
If you're new to WhatsApp forms and want to understand the concept first, our explainer on what a WhatsApp form is is a good starting point. If you want a broader playbook for turning chats into leads, read WhatsApp lead generation. And if you want the deeper how-to, the help center guide on creating your first WhatsApp form is the cleanest next step.
Build faster on mobile too, if that is your thing. Download the app on Android or iOS. If you're on WordPress, use the official plugin.